RESPONDUS Random Questions
Tagged in: Respondus, How to Videos
Description:
Learn how to create random questions.

Tagged in: Respondus, How to Videos
Description:
Learn how to create random questions.
Tagged in: Respondus, How to Videos
Description:
This guide will demonstrate the settings in Respondus.


Tagged in: How to Videos, LEARN V10
Description: The attendance tool is used to help organize your daily attendance. This video will show you how to set one up.
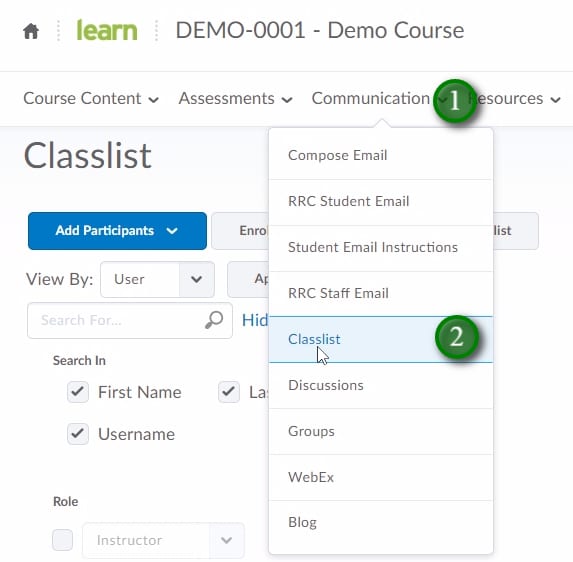
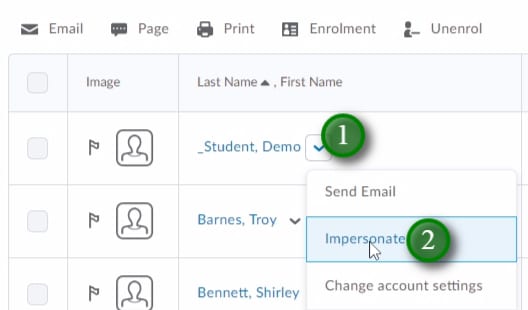
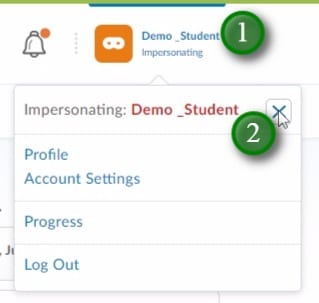
Demo students are used for checking anything in your course which requires a students view. The demo student also allows you to check against grades schemes or rubrics. To request a demo student be added to a course simply email LEARN support at learn@rrc.ca, please be sure to include the name of the course you wish to have the demo student added to.
Tagged in: How to Videos, LEARN V10
Tagged in: How to Videos, LEARN V10
Description:
Version 10 of LEARN introduced “Link Groups”. These allow course tools to appear in a drop-down on the Navigation Bar. This video will show how to Create and Edit custom link groups for your course, and even how to make a link group of external learning resources for your students.
Tagged in: How to Videos, LEARN V10
Description:
The default navbar applied to new courses in LEARN have the tools we felt most useful for your course.
This video will show you how to easily customize your own navbar with the tools you want to use, and even links to external resources.
Tagged in: How to Videos, LEARN V10
Description: The following video will show you how to build a rubric for your course and how to incorporate it into your dropbox item.
The TLTC frequently assesses new software. We post parts of our internal reviews on our blog, but we do not necessarily endorse the technologies presented here. Please use this post for information only. The TLTC only supports technologies listed in our technology toolbox.
There are different softwares that help to organize and present educational materials in interesting and challenging way to students. In this Post we will preset to your attention different tools that can create your course lessons with engaging interactive content. Read More →
The TLTC frequently assesses new software. We post parts of our internal reviews on our blog, but we do not necessarily endorse the technologies presented here. Please use this post for information only. The TLTC only supports technologies listed in our technology toolbox.
The TLTC has been looking and testing softwares that are friendly to use and produce good quality products. Some instructors are going to create their first videos by themselves and we want to make it easier for them, so they will be able to concentrate on their content and not fighting with the production hardware or software.
This post will introduce you to softwares that we checked and recommend to use when you need to create your Microvideos. We found friendly to use and effective Web camera recorders and screen capture softwares that will work for your needs and assist you to get good quality videos.

Use this software when you need to record Talking Head Microvideo or to capture computer’s screen. For Talking Head Microvideo, download Debut, add a web camera to your computer and record.
Debut records good quality image and can produce different export formats – we recommend saving your files as MP4 because this format works with LEARN website best.
You can download Debut here: http://www.nchsoftware.com/capture/
This software has the same options as Debut Video Capture and more. You can record yourself talking or capture your desktop and edit. Camtasia Studio has large video editing options that allow editing your videos and adding titles.
You can download Camtasia Studio here: http://www.techsmith.com/download/camtasia/default.asp
This one is perfect for screen captures. Jing gives you option to choose the exact place on your desktop, mark it and capture what you need.
You can download Jing Screenshots Capture here: www.techsmith.com/jing
Note: most software has 30-day free trial versions.
Web Camera, stand, Document Camera such as Elmo or Ladybug all this equipment you can get by contacting Library’s Media Services Department:
Phone: 632-2231
Email: Media@RRC.CA
The TLTC frequently assesses new software. We post parts of our internal reviews on our blog, but we do not necessarily endorse the technologies presented here. Please use this post for information only. The TLTC only supports technologies listed in our technology toolbox.
![]()
Aviary Tools is a bunch of online creative applications for artists of all genres from image editing and logos creator to audio editing and music maker. I found this suite full of friendly and easy to use tools that can be used right in your web browser.
Here are three applications that I find as very helpful:
Quick Markup (Falcon)
Some of you may find this tool very useful! If you are not looking for Image editing software because you need only to make small marks such as add text and markup the images to highlight the important parts Quick markup will make your editing easier.
Quick Markup’s main features are to point on the important things and add comments:

Quick markup also will resize, rotate and crop images easily if you need and save your image on desktop.
Image Editor (Pheonix)
Looks and feels a lot like Photoshop. It has layers, masks, undo history, effects, brushes that you can customize as well as a good number of filters that make manipulating photos easy. This tool is perfect for basic and advanced image editing.
Vector Editor (Raven)
This one is for people who are looking to create things. Images produced can be used as logos or applied to t-shirts and other garments. The application allows users to work with lines, paths, curves and objects.

Aviary is also offering online tutorials videos and a Forums that help its users to improve their design abilities.
I recommend to explore Aviary Tools!
RRC Polytech campuses are located on the lands of Anishinaabe, Ininiwak, Anishininew, Dakota, and Dené, and the National Homeland of the Red River Métis.
We recognize and honour Treaty 3 Territory Shoal Lake 40 First Nation, the source of Winnipeg’s clean drinking water. In addition, we acknowledge Treaty Territories which provide us with access to electricity we use in both our personal and professional lives.