Learning Technologies

Learning Technologies

Uncategorised

Anna Hughes Video Review – The Importance of Clear Goals

May 29, 2019

Lynda.com review: The Importance of Clear Goals

“Did you put your lunch box away, is a common question I ask my 15-year-old son Michael. Nope, I didn’t have time, is most often the reply.

This conversation seems to be a daily déjà vu moment for me. Didn’t I ask this yesterday? And didn’t he answer exactly the same? Yes, and yes.

While I am getting upset with my teenaged son, I realize that I often find myself in this very spot – I have lots of tasks, commitments, and promises I made. However, when asked whether they are done (yet!), my answer replicates the one of my son’s… That is, “Nope, I didn’t have time!”

So, where did all this time go?

In a search of the answer to the question, I watched a very good Lynda.com video titled “The Importance of Clear Goals” by Chris Croft.

In this video, Chris reveals that the key in time management is to spend more time on what is important and, respectively, spend less time on what is not important.

Wait a minute! – I thought. Everything I do IS important.

As if he heard me saying this, Chris offered his view on how we determine which things are important and which are not.

He simply states that if an activity moves us towards our goal, it is an important one. If it doesn’t, it is not.

How much simpler could it be? As soon as I heard it, I started measuring my own daily tasks against this criterion.

I asked myself, “What is the goal of our work at Enrolment Services?”

My own answer was, “The end goal is to make sure our students are successful! Not only do we need to make sure they are in to RRC, but we also need to make sure they are out successfully, with certificates, diplomas, and degrees earned”.

“So”, I thought. Which ones of my tasks are serving the goal above?

“All of them”, – I immediately replied to myself. But is it really so? I am sure all of us at RRC would like to think that all tasks we perform have the end goal of serving our students. While I am sure most have that end goal, I also think that some tasks are more directly related to serving students than others.

How do we deal with it? Chris suggests two approaches to dealing with tasks that are of a lesser priority:

  1. Saying “no” to customers
  2. Negotiating the time allotted to complete the task

Both options relate to explaining to your customers (students in our case) that we would like to provide an excellent service/product and that we may not be able to complete the task in the short time period. The key here is, we don’t want to make promises we cannot keep. Either to our customers or to our bosses. As someone who was raised in such a way that a person should always keep the promises s/he made, I related to this statement. My take away from this is that it is better to under promise and over deliver, rather than the other way around.

So, let us find the tasks that really matter and spend more of our time on them!

Overall, Chris’ video is a good one to watch for those who are looking for efficiencies in their daily life (both in and outside of work) and for those who are interested in practical solutions for reducing unimportant activities in daily operations.

I recommend watching the video!

Do you have a tip or idea that has helped you set clear goals? I welcome your suggestions, email me directly at anhughes@rrc.ca

Summer/Fall 2019 Faculty Training Menu

May 2, 2019

Summer/Fall 2019

The following is a list of training sessions being offered through the Centre for Learning and Program Excellence. Click the title of the presentation for the full description and sign up available on the Course Catalog.

Date                                  Duration Title Campus Room Start Time End Time
Aug. 19, 2019 3hr LEARN – Intro to LEARN – August 19, 2019 NDC A115 10AM 1:00PM
Aug. 21, 2019 2hr LEARN – Content Training – August 21, 2019 NDC A115 10AM 12:00PM
Aug. 23, 2019 2hr LEARN – Gradebook Training – August 23, 2019 (Including new HUB grades export integration) NDC A115 10AM 12:00PM
Aug. 26, 2019 3hr LEARN – Intro to LEARN – August 26, 2019 NDC A115 10AM 1:00PM
Aug. 27, 2019 2hr LEARN – Quiz Tool Training NDC A115 10AM 12:00PM
Aug. 28, 2019 2hr LEARN – Content and Dropbox Training NDC A115 1:00PM 3:00PM


Building Rubrics in LEARN

March 7, 2019

Building Rubrics in LEARN

Properties – Part 1

First you will have to choose your settings for your rubric:

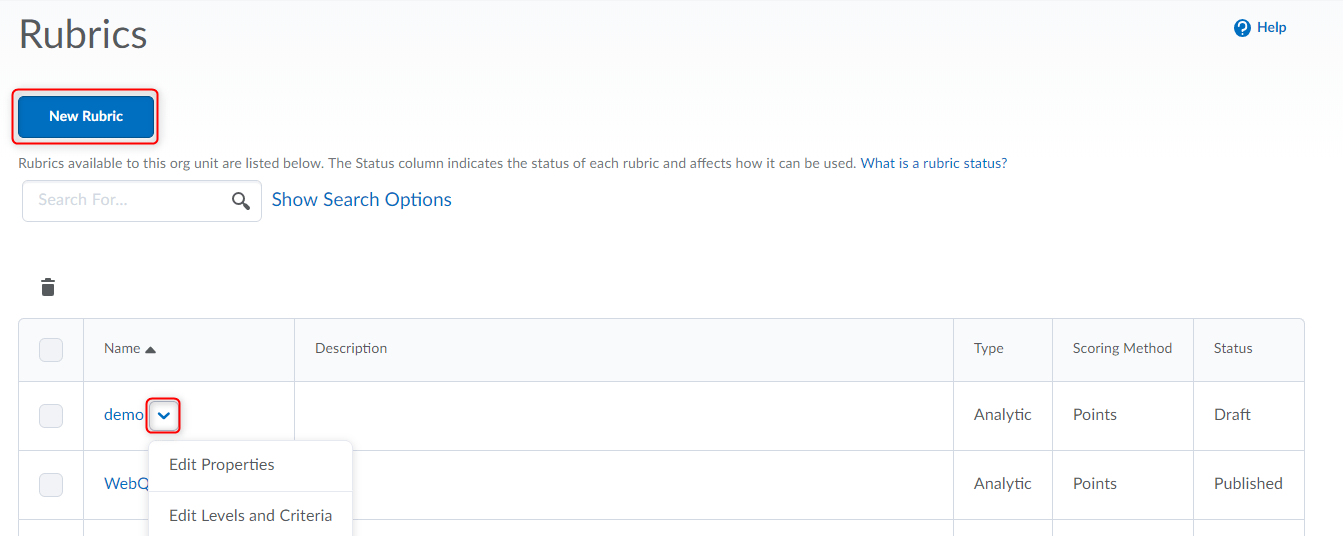
  1. Click “Assessments“, and then “Rubrics
  2. You will see a list and the status of any rubrics that you have created or have been shared down to your course.
  3. Next click “New Rubric” or click the dropdown menu (“V” icon at the end of the name) associated to an existing rubric to edit it.
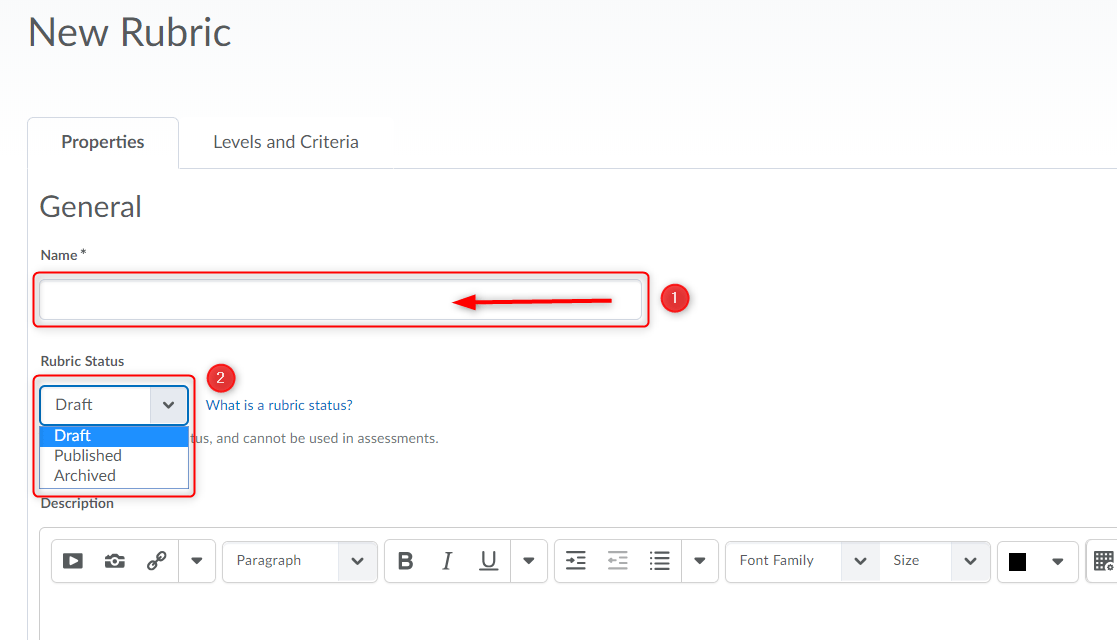
  4. Give your rubric a name (1).  You can write a description if you want.
  5. Your rubric will be in “Draft” mode while you work on it.  When complete make sure you set it to “Published” (2).
  6. Typically we will use the “Analytic” rubric when building a rubric for college use.  Feel free to experiment with the Holistic rubric type, but it will behave quite differently than what I’m describing in this tutorial.Analytic Rubrics –Most rubrics are analytic. An analytic rubric breaks performance into multiple criteria. You assess each criterion separately, resulting in an overall assessment score. For example, an analytic rubric for assessing essays could have separate criterion for spelling, grammar, and expression. Each criterion can be assessed as poor, good, or excellent, resulting in an overall assessment that adequately evaluates performance.Holistic Rubrics – Holistic rubrics do not break performance into separate criteria. Performance is assessed holistically, so that you consider several different criteria, but make only one overall assessment.
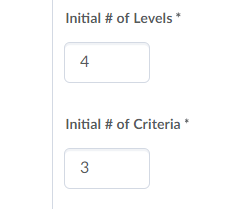
  7. Set the number of levels (example:  below average, average, and above average would be 3 levels), and number of criteria you will be using.  You can always add and remove criteria when building the rubric.

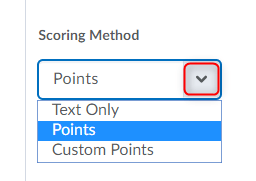
  8. The scoring method can be points, custom points, or text.  The difference between points and custom points is that points will assign one value for all criteria under a specific level, where custom points allows for custom points for each criteria under each level.  Feel free to click “What are scoring methods?” for more details.


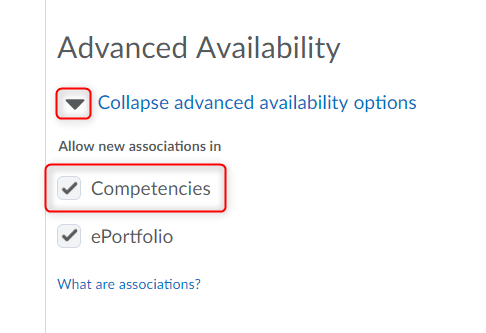
    Please don’t remove the checkbox from “allow new associations in competencies“.  If you leave it checked, it won’t cause any ill affects.  If you un-check it, your rubric won’t be as functional for grading in a Dropbox etc.


9. Save your Rubric and then scroll up to the top of the page and click “Levels and Criteria


Course Content – learner

July 26, 2018

View course content

Use the Content tool to access course materials, complete required activities, and monitor your completion progress on topics contained within each course module.

Content tool overview for learners

An overview of the Content tool

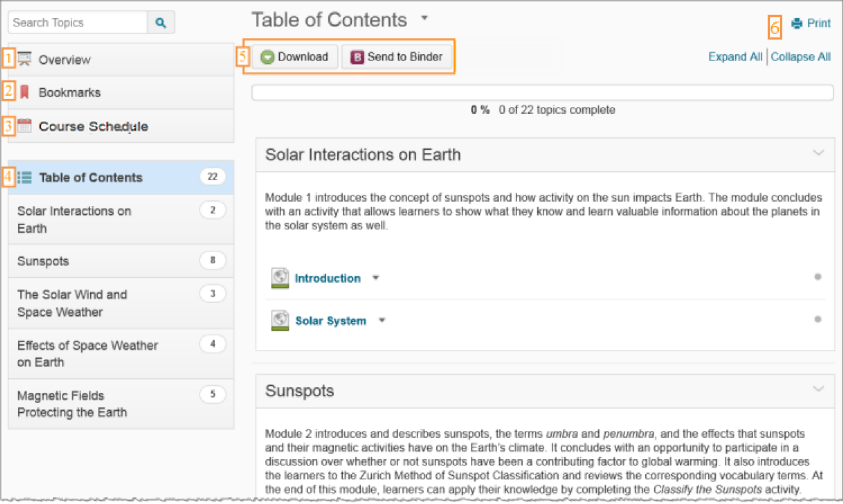
1) When you access a course’s Content tool for the first time, the first page you land on is the Overview, which instructors might use to post the course syllabus and introductory material. If your instructor has left the Overview blank you will not see it listed and you will land on the Table of Contents.

2) Topics you bookmark appear in a list on the Bookmarks page. The number beside the Bookmarks link indicates how many bookmarks you have.

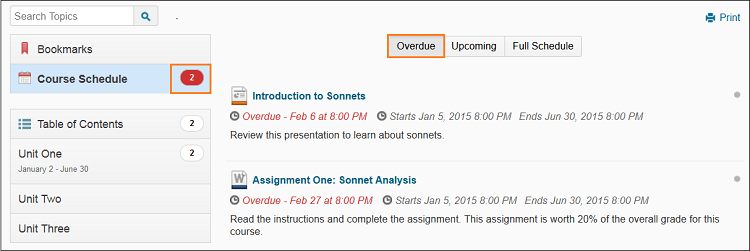
3) The Course Schedule page lists course material due dates, start dates, end dates, overdue course activities, and all events within the course from the Calendar tool for the next seven days. The number of overdue items in the course appears in red. Course events are also listed in the Calendar tool.

Note: Adding a due date to a content item that is associated to an assignment submissions folder will override an end date that is also set on the same Assignments.

4) The Table of Contents panel lists all modules available in your course. If numbers appear beside each module name in the Table of Contents panel it indicates that topics are being tracked for completion, and that you have a number of topics you have not accessed.

5) The course content options located on the Table of Contents page allow you to download your course content in zip file format.

6) Print your course outline, or navigate to a module’s landing page to print a module’s outline.

Print a content topic

The print function may not be available for all file types.

  1. Click on a document topic.
  2. Click  Print or click  Download and print from your computer.

View overdue Content topics

View a list of all overdue content topics within a course in the Overdue tab in the Course Schedule area. The topics on this list are sorted from most to least overdue. You can click the topic to immediately access and complete the topic. Only topics with a set due date but no end date or an end date later than the due date appear on this list since you must have time remaining after the due date to access and complete the topic. The Overdue tab only appears if you have content topics that are not complete by the set deadline.

The number of overdue topics in the  Overdue tab appears in red beside Course Schedule in the Content menu. When you access an overdue topic, it disappears from the list in the Overdue tab. When you complete all overdue topics, the Overdue tab disappears from the Course Schedule area.

Video:

ePortfolio in LEARN

March 20, 2018

LEARN ePortfolio

Brightspace ePortfolio is a personal portfolio tool for storing, organizing, reflecting on and sharing items that represent your learning. You can include items such as documents, graphics, audio files, videos, presentations, and coursework to demonstrate your improvement or mastery in certain areas.

You can control what items you want to include in your portfolio, how they are organized, and who you want to share them with. When you share items with your peers, mentors, or potential employers, you can give them permission to view items, edit items, see or add comments, and see or add assessments to receive feedback.

Getting Started

Use this handy ePortfolio Learning Roadmap developed by Mohawk College to learn terminology and start navigating the ePortfolio tool in LEARN.

Creating and Adding Artifacts to your ePortfolio

Creating and Editing your ePortfolio Presentation

Presentations let you compile Brightspace ePortfolio items into a web project to showcase your achievements. Your presentations can have multiple pages. Presentations provide a polished, professional medium to demonstrate your learning and accomplishments.

Submitting, Sharing and Exporting Your ePortfolio Items/Presentation

Instructor Resources

Most use cases of ePortfolio are user-led, however, instructors can create workflows for self-reflection, self or peer evaluation, and incorporate assessment activities to interface with ePortfolio.

Export your ePortfolio to Brightspace to access after graduation

March 20, 2018

Export your ePortfolio to Brightspace to access after graduation

You are able to transfer artifacts from your ePortfolio to a free service provided at myDesire2Learn.

ePortfolio – Navbar

March 19, 2018

Adding ePortfolio to you Navbar

  • Enter your course, Click “Edit Course”

Adding ePortfolio to you Navbar;Enter your course, Click "Edit Course"

  • Click “Navigation & Themes”

;Click "Navigation & Themes"

  •  Click the dropdown menu connected to the default Nav bar (1), click “Copy” (2)

;Click the dropdown menu connected to the default Nav bar (1), click "Copy" (2)

  •  Click the name of the new navbar copy to edit

;Click the name of the new navbar copy to edit

  •  Rename your Navbar (1), Click “Add Links” (2)

;Rename your Navbar (1), Click "Add Links" (2)

  •  Select the Navbar items you wish to add (1), in this case, “ePortfolio” and click “Add” (2)

;Select the Navbar items you wish to add (1), in this case "ePortfolio" and click "Add" (2)

  •  You are able to move the new link by clicking and dragging it. (1)
  • When done, click “Save and Close” (2)

;You are able to move the new link by clicking and dragging it. (1)
 When done, click "Save and Close" (2)

  •  Click the “Active Navbar” dropdown and select your new Navbar, (1) click “Apply” (2)

;Click the "Active Navbar" dropdown and seelct your new Navbar, (1) click "Apply" (2)

ePortfolio – Creating and Uploading Files as Artifacts

March 19, 2018

Artifacts in ePortfolio

There are several different types of files that you can upload to your presentation.

Artifacts used in ePortfolios are digital evidence of your learning, experience, achievements and goals. They are the building blocks of everything you do within the ePortfolio tool. An artifact can be almost any kind of file.

The artifacts you collect should have a purpose in demonstrating a skill or competency. You should collect a wide range of artifacts so you have many options to choose from when you build a presentation. Examples of artifacts you can include are:

  • Writing
    • Papers, projects, and writing samples
    • Journal/blog entries
    • Word, PDF, etc.
  • Projects, Assignments
    • Group projects
    • Examples of work from the class
    • Video and audio clips
    • Photographs, images, artwork
  • Work experience
    • Co-op and work experience
    • Community and service learning
    • Examples of Prior Learning
  • Other
    • Academic awards and honors
    • Grades
    • memberships in professional organizations
    • Certifications, WHMIS etc.

Uploading Artifacts

Video

Adding Files from your Computer as Artifacts

  • Click “Add Files”

;Click "Add Files"

  •  Click “Upload” or drag and drop your file

;Click "Upload" or drag and drop your file

  •  After uploading your file you can “Add tags” (1), and when done click “Add to Portfolio” (2)

;After uploading your file you can "Add tags" (1), and when done click "Add to Portfolio" (2)

Adding Assessments etc. as Artifacts in ePortfolio

You are able to add course content as reflections as well as add feedback, grades, assessments etc. as artifacts.

  • Find what you would like to add.
  • In this example, “Assessments”(1), “Dropbox”(2)

Adding Assessments etc. as Artifacts in ePortfolio;You are able to add course content as reflections as well as feedback, assessments etc. as artifacts. Find what you would like to add. In this example, "Assessments"(1), "Dropbox"(2)

  •  Click “View” to view the feedback on the assessment

;Click "View" to view the feedback on the assessment

  •  Click “Add to ePortfolio”

;Click "Add to ePortfolio"

  •  Give your Artifact a name (1), add a description and tags if you wish and click “Add” (2) when done.

;Give your Artifact a name (1), add a description and tags if you wish and click "Add" (2) when done.

ePortfolio – Tagging Artifacts

March 19, 2018

Tags

Tags are words you associate with your artifacts or items to make them easier to find within your ePortfolio.

You can search for items with specific tags. When searching for or adding tags, other users tags are shown for easy searching. For example, searching for or utilizing a tag named Creative will show the number of times it has been used as a tag.

  • To make a multiple-word tag, place double quotes around the entire phrase. For example typing “winter project” makes the two words a single tag.
  • To make a private tag that only you can see, type an @ symbol in front of the tag. For example typing @draft adds a private @draft tag to an item that other users will not see when you share the item with them.
  • To make a private multiple-word tag, put the at symbol before the quotation marks, for example: @”rough draft”.
  • To add tags to an existing artifact first click “edit” from its drop-down menu:
    Edit artifact menu item
  • Enter your tags and hit “Add Tag”:Add tags field

RRC Polytech campuses are located on the lands of Anishinaabe, Ininiwak, Anishininew, Dakota, and Dené, and the National Homeland of the Red River Métis.

We recognize and honour Treaty 3 Territory Shoal Lake 40 First Nation, the source of Winnipeg’s clean drinking water. In addition, we acknowledge Treaty Territories which provide us with access to electricity we use in both our personal and professional lives.

Learn more ›